
23 May Behind the Build: A Belgard Backyard Transformation
Have you ever wondered what it really takes to transform a backyard? Curious about the construction process — or how much it might actually cost? You’re not alone. In this walkthrough, we’ll take you step-by-step through a Belgard-featured project and break down exactly how we turned a blank canvas into a backyard made for relaxing, entertaining, and everything in between.
By the end of this post, you’ll have a clear understanding of how we build spaces like this, the materials we use, and the kind of investment it takes to bring it all together.
Before
Step One: Demo
Demo day is always satisfying. All that time and energy spent building a deck or pouring concrete? Gone in minutes. Our Bobcat made quick work of removing everything near the house, giving us a clean slate to start fresh. This step sets the tone for the whole project — clear space, ready for a new vision.
Step Two: Layout
In this case, we didn’t need the layout to be perfect, but it still had to be close. We used string lines and squared everything off the house. Then, we marked the layout with white paint to show exactly where we needed to excavate and lay the base. While we hauled out the dirt, we simultaneously started bringing in gravel and prepping the base for the porch.
Steps Three & Four: Excavation and Base Prep
Excavation and base prep are often done together. First, we cleared out all the upper-level soil. Then, we began layering our base using 57 stone — a highly stable material that doesn’t settle, shift, or trap water. This type of base is essential for elevated features like the raised porch.
Before finishing the excavation, we installed white PVC sleeves (you can see them sticking up in the video) to route utilities for the outdoor kitchen.
Once the main gravel base was compacted, we added a final layer of #8 chipped rock. This acts as a bedding layer for the pavers and locks into place during final compaction. The open-grade base system we used is semi-permeable, which means it handles rain well and allows water to seep slowly back into the soil — great for preventing runoff and project delays.
After
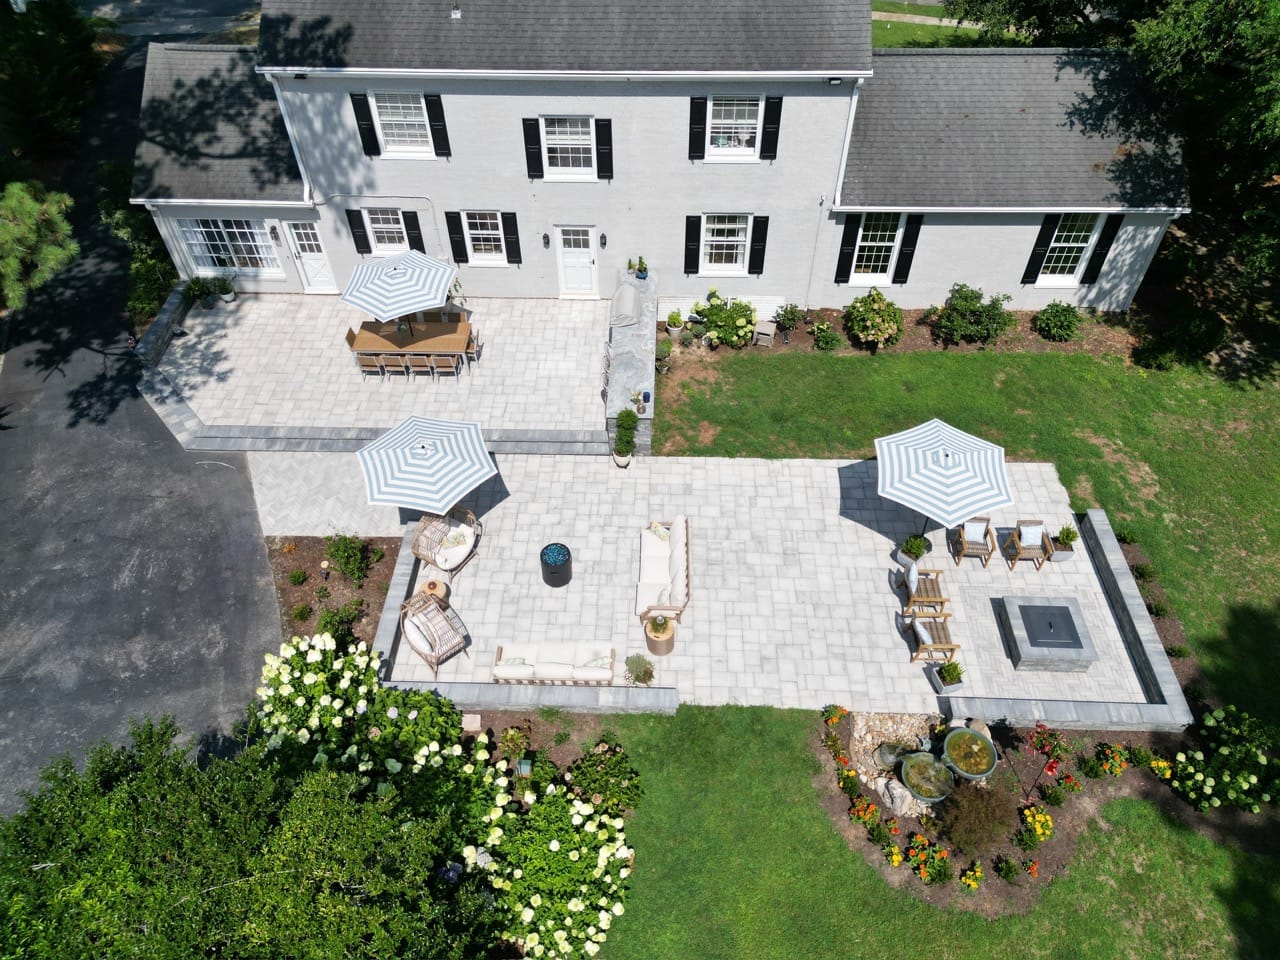
Paver Installation and Seating Wall
After base prep, we began laying pavers for the lower patio. Because the backyard was large and open, it lacked a sense of direction — it felt like one big hallway. To create structure and flow, we installed a seating wall. This defined the space and gave it a main entrance and exit between the lower patio and the raised porch.
Outdoor Kitchen
Next, we constructed the outdoor kitchen using the same base and stone materials for visual cohesion. At 16 feet long, it features a built-in grill, under-counter storage, and a hidden trash bin — all designed to make backyard cooking seamless.
Upper Patio and Drainage
We then moved to the 525-square-foot upper patio. One of the most important parts of an elevated paver porch is drainage. In this build, we installed a French drain system along both the foundation and the outer steps. This tied into an existing PVC drain that emptied into a nearby ditch, keeping water from pooling near the house and ensuring the space stays dry and secure.
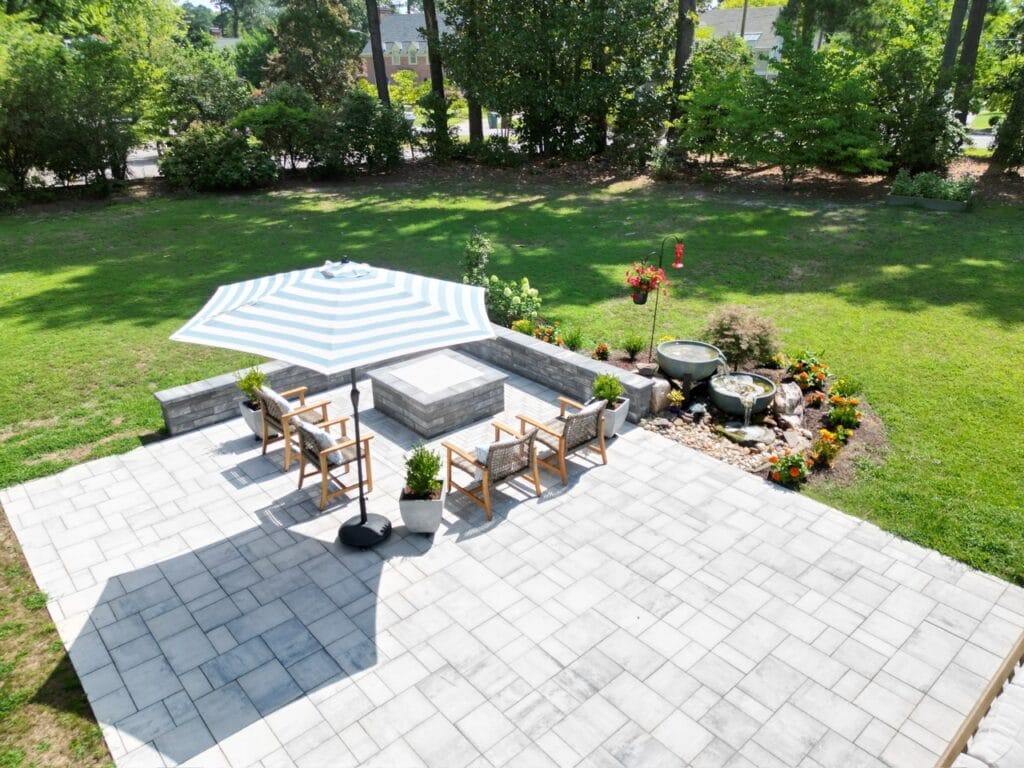
Final Touches: Fire Pit, Walkway, and Fountain
Once we finished cutting and compacting the pavers, we installed polymeric sand to lock everything in place. Then came the final touches: a 50×50 fire pit area with a Breeo insert for cooking and gathering, and a two-bowl outdoor fountain to add the soothing sound of running water.
The finishing detail? Lighting. We installed 20 integrated cap lights across the 56-foot seating wall and around the outdoor kitchen, making the space glow beautifully at night.
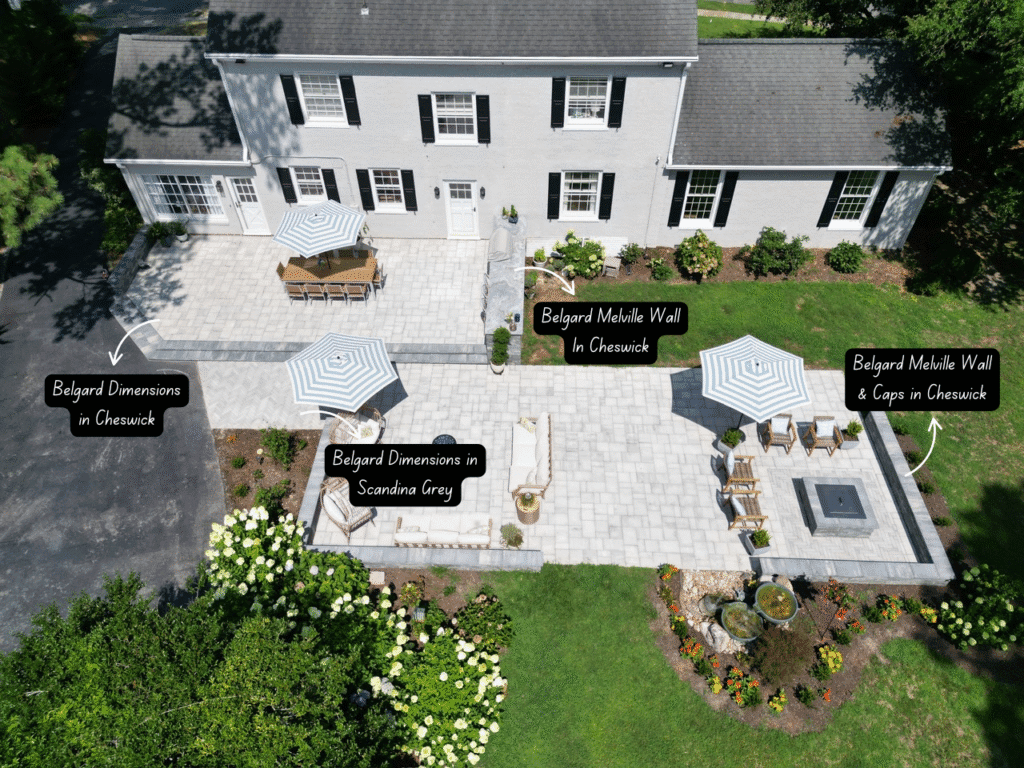
Belgard Materials Used
We used Belgard products throughout this build to bring a long-lasting, cohesive look to the entire backyard:
- Main Patio (Upper and Lower): Belgard Dimensions pavers in Cheswick
- Seating Wall, Fire Pit, and Kitchen: Belgard Melville Wall in Cheswick
- Walkway and Fire Pit Area: Belgard Dimensions pavers in Scandina Grey
The Investment
This entire backyard transformation totaled $91,807.25. Here’s what that included:
- 1,072 sq ft lower patio
- 525 sq ft upper patio
- 16 ft outdoor kitchen with grill, trash, and storage
- 56 linear feet of seating wall with 20 integrated cap light
- 50×50 fire pit area with Breeo cooking insert
- Two-bowl outdoor fountain
This isn’t just a patio — it’s a purpose-built outdoor living space tailored to the homeowners’ lifestyle. From the layout to the last brick, every detail was designed with care.
Thinking about transforming your own backyard? We’d love to help you bring your vision to life.