
20 Nov How to Build a Patio That Will Last a Lifetime
Now, I know what you’re thinking: “How long will my patio really last?” Well, that depends on the quality of the materials you choose, but a properly installed paver patio can last for around 30 years. Today I want to take you behind the scenes of a recent project where we transformed a small backyard space into something simple, yet amazing. We’ll be sharing a closer look at how to lay a proper foundation for your paver patio, as well as my simple method for choosing the right pavers for your space. Keep reading to learn more!

The Challenges
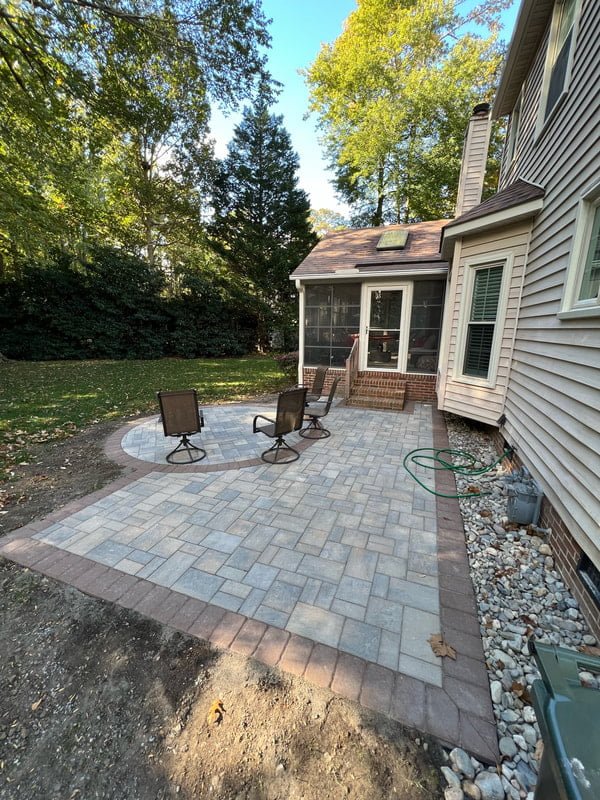
So, let’s dive into the details of this job in Yorktown, Virginia . We had a tight timeline – just one day – to install a 325 square foot paver patio for our homeowner. But before we could even think about laying down the pavers, there were a few challenges we had to overcome. First, we had to make sure we matched the grade at the bottom of the steps. You know how frustrating it is to walk down stairs and find that the bottom step is a different height than the rest? Well, we didn’t want our homeowners to have that experience. So, we meticulously excavated and ensured that the stair treads would be even and level. No stumbling or unexpected leg-giving-out here!
Next on the list of challenges was the irrigation system running through the area. We knew we had to tread carefully, as hitting a sprinkler line could turn into a major headache. But don’t worry, we navigated the excavation process with precision and avoided any encounters with the irrigation system. Phew!
Laying a Proper Base
Now, let’s talk a little bit about the importance of a proper base for your paver installation. You see, one common reason people are hesitant to use pavers is due to previous bad experiences where they were poorly installed. Uneven pavers with weeds growing through them are not a sight anyone wants to behold in their backyard paradise. But fear not, my friends! I’m here to guide you through the proper installation process and ensure that your pavers stand the test of time.
Step 1: Fabric Layer
The first step in creating a solid base for your pavers is to lay down a fabric layer. This helps to prevent the growth of weeds and other vegetation that can wreak havoc on your beautiful patio. Trust me, you don’t want to skip this crucial step!
Step 2: #57 Gravel
Next, it’s time to talk gravel. A proper base requires using a gravel that compacts well and can support the weight of people, vehicles, and all the activities that will take place on your patio. To create an open grade base like we’ve done for this patio, we’re using #57 gravel, which is 5/7ths of an inch across. This might sound technical, but all you need to remember is that it provides the stability and strength your paver installation needs.
Step 3: #8 Gravel
After laying down the #57 gravel, it’s time to take it one step further. Enter #8 gravel – a smaller rock that helps create a level and even base for your pavers. As you spread the #8 gravel and use rakes to level it out, you’ll be amazed at how you can create a smooth, strong foundation for your pavers to rest upon. Hello, stability!
Concerns About Paver Patios
Now, for the million-dollar question: why are some people hesitant to use pavers? Well, there are a few reasons. First, some worry about the cost. Yes, pavers can be more expensive upfront than other options like poured concrete. However, when you consider their durability and longevity, pavers often prove to be a worthwhile investment. Think of it as a long-term upgrade that adds value to your home and allows you to enjoy your outdoor space for years to come.
Another concern is the maintenance involved. Sure, pavers require a bit more care than a simple concrete slab, but the benefits far outweigh the extra effort. Regular sweeping, occasional power washing, and reapplying joint sand every few years will keep your pavers looking pristine. Plus, if a paver were to crack or get damaged, you can easily replace the individual stone without disrupting the entire patio. Talk about convenience!
Lastly, some folks worry about the pavers shifting or becoming uneven over time. This is where proper installation comes into play. By following the steps I outlined earlier – the fabric layer, the proper gravel base, and the leveling process – you’ll minimize the risk of any shifting or unevenness. Goodbye, wobbly pavers! Hello, stability and longevity. And when I say longevity, I don’t mean five or six years. The lifetime for a properly installed paver patio should be about 30 years.
Designing Your Paver Patio
Now that we’ve addressed the concerns and demystified the installation process, let’s talk about the incredible possibilities pavers offer for your outdoor space. Options range from warm tones to cool tones, allowing you to create a seamless blend with your existing home and landscape. And when it comes to size, there’s something for everyone – small, medium, or large. The variety is truly endless!
What truly sets pavers apart is the flexibility they provide in terms of design. Whether you prefer a simple and clean aesthetic or want to let your creativity soar with unique patterns and inlays, pavers can accommodate your vision. The flower paver pattern in the patio pictured below is a prime example of the design possibilities that await you. Don’t be afraid to think outside the box and let your personality shine through your outdoor space!
There are so many different paver options when it comes to style, color, size, and texture. It can be overwhelming to even know where to begin! But don’t worry – I’m here to break it down for you.

Color, Size, and Texture
First, let’s talk about color. There are really three main color families – warm tones, cool tones, or a combination of both. You can choose a uniform color throughout your patio, or mix and match for a dynamic contrast. Consider the existing color scheme of your home and yard to guide your decision.
Next up is size. Pavers come in a range of sizes, from small 6×9 inch pavers, to medium 12×12 inch pavers, to larger 18×30 inch ones. The choice is yours, based on the size of your space and the design aesthetic you’re going for.
And finally, texture. This is where you can really get creative and add personality to your patio. Do you want a more smooth and sleek look, or something with a bit of texture and variance? Clefts and divets can create a rock-like appearance, for example, and add a bit of character to your outdoor space.
So, with those three main factors in mind – color, size, and texture – you have a world of possibility when it comes to paver options. Once you understand these differences, you can simplify the decision-making process and find the perfect pavers for your unique space. And don’t be afraid to get creative with your installation – whether it’s a unique inlay design or a more straightforward arrangement, your choice of pavers can truly bring your outdoor space to the next level. After all, your backyard is an extension of your home and should reflect your personal taste.
For the project we’re sharing today, the existing warm-tone siding of the house inspired us to go with the Eva Paver from Techo-Bloc in the color Champlain Grey. This color has a combination of grays and tans, and we opted for a chocolate brown border, using 6×9 inch pavers to create a beautiful contrast. And to add some variety and personality, we incorporated a paver circle in the center of the patio. Talk about making a statement!
Paver Patio Cost
Now let’s talk about the financial side of things. I know some of you may be wondering, “Micah, how much does all of this cost?” Well, my friend, let me break it down for you. The total cost for this project was around $10,000, and it breaks down roughly like this –
- Pavers: $5 per square foot
- Gravel and Fabric: $5 per square foot
- Labor/Installation: $5 per square foot
- Misc (soil disposal, waste, etc.): $1.50 per square foot
Our goal on a project like this is to achieve a 40-50% gross margin. In this case, that means we would make around $4500 for a day’s work. Now, I know that might sound like a lot, but when you consider all the advertising, overhead costs, and even the expense of creating this content, it all adds up. Building a successful business and establishing a brand that can consistently deliver high-quality results requires careful attention to these financial factors.
But let’s not lose sight of the true value here. This backyard transformation didn’t just result in a beautiful patio; it created a space for our homeowner to relax, entertain, and truly enjoy the outdoors. A cozy spot for a fire pit, a designated area for the grill, and a warm and inviting atmosphere that invites more quality time spent outside. Who wouldn’t want that?
Thanks for joining me on this journey, and until next time, get outside my friends!
